Showing posts with label Block Tutorial. Show all posts

Thursday, 3 March 2016

Scrap Box Tutorial for Siblings Together: Scrappy Colour Box Rail Fence.

 Today we have  the second in our series of scrap box tutorials by Sarah of Sew me. Over to you Sarah:

I'm back today with a second tutorial for a block that will help you reduce your scrap boxes and make a funky, colourful quilt for Siblings Together.


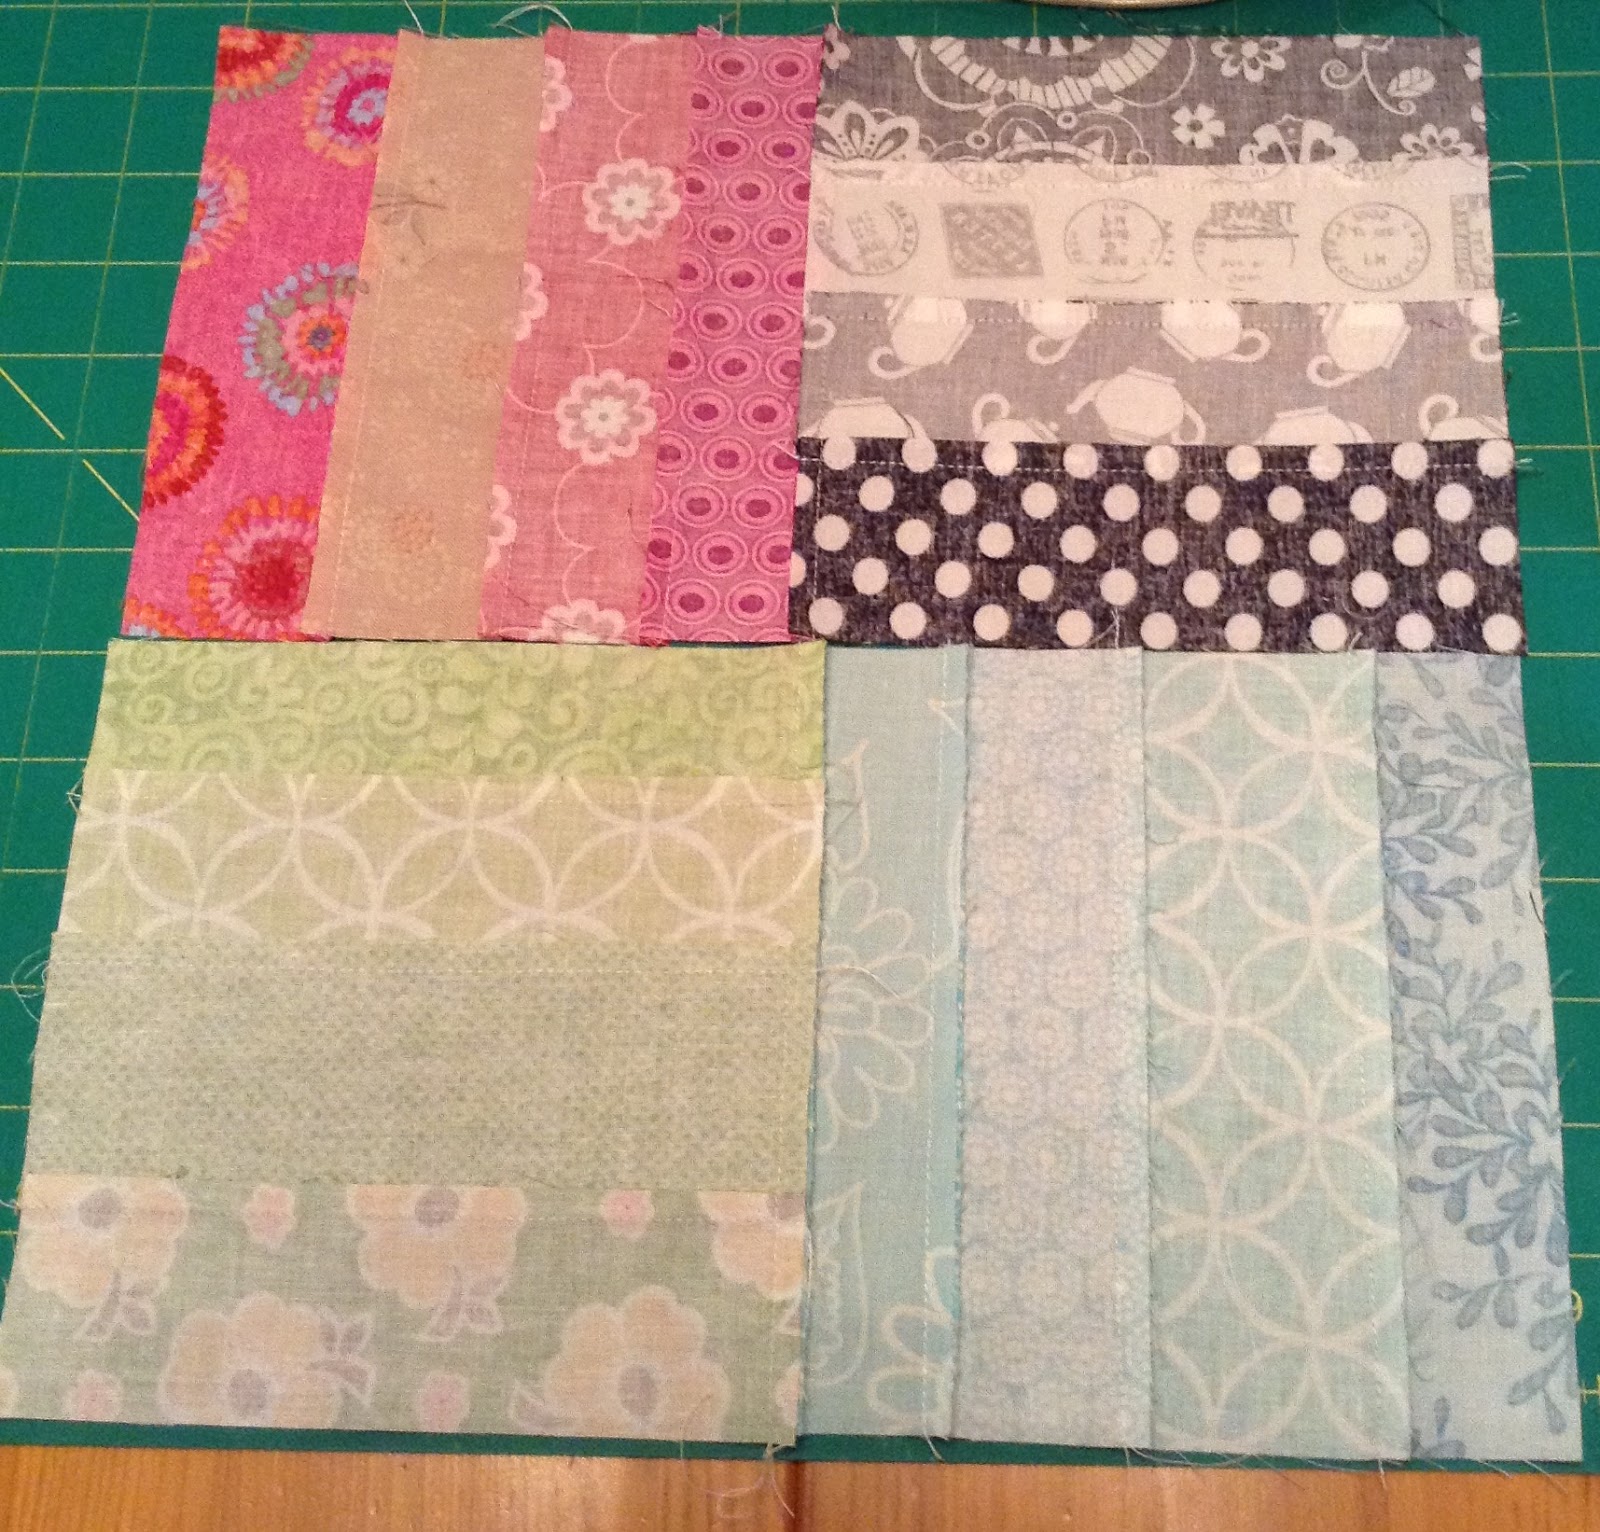
The pic above shows two of the scrappy colour block rail fence blocks that this tutorial makes.  Again, no rocket science involved but it's all here for you if you fancy having a go.  This quilt was the inspiration for these blocks.  You need to have a wee peek just to see.

Anyway, while the inspiration quilt is all nice and regular sized pieces, I really wanted to crack into my store of scrappy strips of all widths and I imagine this would help a lot of you reduce your scrap mountains too!  So, for this block I worked in quadrants of single colour ways and strips of varying widths.  Go get yours and join me (and forgive for the terrible lighting in my tutorial pics).

Scrappy Colour Block Rail Fence Block

This will yield an unfinished block measuring 12.5" x 12.5" and uses scant 0.25" seams throughout.

You will need 6.5" lengths of scrappy strips in four different colour ways.


For each quadrant of your block take a number of 6.5" scraps in one colour and stitch them together along the longest side.  You will need enough strips so that your finished quadrant can be trimmed measure 6.5" square.  Just a tip: don't make the outer strips too narrow or you may lose them in your seam allowances.


Handy hint: This block will come together very quickly if you chain piece your strips in colour pairs.


Once your strips are pieced in each colour block, press the seams all in the same direction.


Then, trim each colour block to 6.5" square.


When you have all four 6.5" colour blocks made.  Lay them out as above, alternating the horizontal and vertical direction of the strips.


Stitch the top two quadrants together and then stitch the bottom two together and press the joining seams in opposite directions.


Pin the top row and bottom row together, nesting the seams that you pressed in opposite directions neatly.  Stitch together and press your centre seam open.


Now that you have all four colour block quadrants together all that remains is to trim the block to 12.5" square before you start on a second one! ;-)

Remember, this little tutorial is just to show you how easy it would be to make a fun quilt from your scraps for a very worthy cause.

My first scrap box block can be found here if you are interested.  As always, I am very happy for anyone to reference these scrap box block tutorials or indeed any of my block tutorials for use in your Charity Bees or even just your ordinary Bee groups.

There will be another block along soon, so keep reading!

Sunday, 28 February 2016

Siblings Together Bee 1. March Block


 This post gives instructions for the March block for the ladies of the Siblings Together Bee 1 from Jen of Glinda Quilts.


Hello all!

March is my month to request blocks for this year's Siblings Together quilt drive from the ladies in our ST quilting bees group. I am so thankful and lucky to be a part of this fantastic cause.

As well as a couple of Bees, individual quilters across the land and beyond are making quilts for this year's camps where children separated by the care system come together and are gifted a quilt. Please visit the site and blog for more information and how you can help. 

Here are the instructions (note the high-tech designing ... NOT!):


And here is my 18.5" finished block:


I decided to stay away from my favourite pinks and go with something a bit more colourful. You'll need a little bit of orange, blue, green and yellow fabric and some white background (I've used Makower scrolls and an embossed snowflake but any whites will do). 

Each of the 16 units are 5" before sewing so the HSTs will be cut at 5 and 3/4" and the four piece squares cut at 2 and 3/4":


Some Glinda preferences: I don't do random! So I'd like the colour order to be exactly the same as my block, please :) this will flow really nicely once all 12 blocks are sewn together. Also, if you don't mind, please press the seams open. 

Other than that, it's very straightforward, here are some more pics just to show how I put it together:


Thank you, ladies, you're all amazing xx

Siblings Together Quilt Linky Party

Thursday, 25 February 2016

Scrap Box Block Tutorial for Siblings Together: Frame Box.

Sarah from Sew Me is generously sharing a series of Scrap Box block tutorials ideal for making quilts for Siblings Together. Thanks very much Sarah and over to you.


I've been brewing a plan for a while.  It involves delving into my carefully stored and pre-cut scrap boxes and doing something useful with them.  Since committing to a whole quilt myself for the Siblings Together charity just isn't possible this year, I thought I might cheerlead from the sides, encouraging all of you to raid your scrap boxes and make a simple scrappy quilt or two yourselves. 


With a trusty assistant at hand a few weekends ago, we got stuck into my scrap boxes and the three block designs in the top photo are what we came up with.  There's no rocket science in any of these blocks and I'm quite sure that all of you would be able to come with these by yourself.  However, if you're trying to think of a quilt for Siblings Together and would simply like someone to have done the cutting maths for you, I'm going to share tutorials for all three types of block here over the next few weeks.


Frame Box Block Tutorial


Today I'm going to share a tutorial for this block which is a 10.5" x 12.5" unfinished rectangle.  For these blocks I went straight to my box of 2.5" strips. Just a few cuts and a few seams resulted in these pretty framed box blocks.  These would be perfect if you have leftover jelly roll strips or lengths of unused 2.5" binding. So go on, hunt a few out and join in.


To start with you will need 3 different fabrics which are 2.5" wide.

Fabric A (centre rectangle)
Cut 1:  2.5" x 4.5"

Fabric B (first frame - a 2.5" x 22" strip will allow you all the cuts required)
Cut 2: 2.5" x 4.5"
Cut 2: 2.5" x 6.5"

Fabric C (outer frame - a 2.5" x 38" strip will allow you all the cuts required)
Cut 2: 2.5" x 8.5"
Cut 2: 2.5" x 10.5"


Layout your pieces as shown in the photo above.

Using scant 0.25" seams throughout, stitch the borders in place adding the side pieces first and then the top and bottom.


Press seams away from the centre.


Your outer border is added in exactly the same way - sides first, then top and bottom.  Neatly trim to 10.5" x 12.5".   After that, hey presto ...


you will have a great wee block for the start of your Siblings Together Quilt and you'll have done something useful with those scraps!!

I realise that this isn't the most detailed of tutorials, so please do ask if you need any clarification, but honestly it is that simple.

As a by the way, I am very happy for anyone to reference these scrap box block tutorials or indeed any of my block tutorials for use in your Charity Bees or even just your ordinary Bee groups.

Hope to be back soon with the next scrap box block tutorial for you.


Wednesday, 3 February 2016

Siblings Together Quilting Bee - February block request

Hannah is Queen Bee for February and this is what our Queen wants:

"We're making 4 patch snowball blocks measuring 16.5" unfinished.

Limited colour palette please of reds, blues and greys. Any reds and greys are fine and any blue from pale powder blue through to dark navy but true blue rather than aqua please.

This is Joanne's block from Instagram:


I don't mind what prints particularly but nothing too fugly or novelty please as they are biggish cuts so will be noticable. For my background I will be using Kona Snow but any solid white or off white will do just nicely!

The instructions will make one 16.5" 4 patch snowball block. Last time I added an extra row and column to the quilt so if anyone wants to make any extra lonely 8.5" blocks I'd be very grateful. That is optional though!

Instructions as follows then:

From each of four different prints in a limited colour palette please – reds, blues and greys:
Cut 1 square, 8 1/2” for a total of 4

From 2 strips 3” by WOF of white/ off white neutral (I used Kona snow):
Cut 16 squares, 3”

Making The Snowball Blocks:
Take 1 print 8 1/2” square and one solid 3” square marked with a diagonal line.
Place the solid 3” square RST on the top right corner of the print 8 1/2” square.
Pin in place. Sew along the marked line. Repeat with each of the other 3 print 8 1/2” squares and with the other 3 corners of all 4 print squares.
Trim each corner 1/4” from the sewn line and press seams open or to the darker side.
This will give 4 individual snowball blocks 8 1/2” unfinished.
Lay them out into a block of 4.
Sew the top 2 blocks together and press the seam to the right. Sew the bottom 2 blocks together and press the seam to the left.
Sew the top and bottom rows together, locking the centre seam and press to make a 4–patch snowball block 16 1/2” unfinished.

That's it!

Thanks
Hannah x

Please contact Hannah first before you send your blocks!